

How To Uninstall Windows 7 And Go Back To Xp
Windows seven can't directly upgrade a PC running Windows XP, which complicates things for Windows XP owners. To upgrade from Windows XP to Windows 7, known every bit a "clean install," follow these steps.
-
Run Windows Piece of cake Transfer on your Windows XP PC.
The free Windows Easy Transfer lives in the SupportMigwiz on your Windows 7 DVD. To start the program, double-click the file chosen MigWiz.
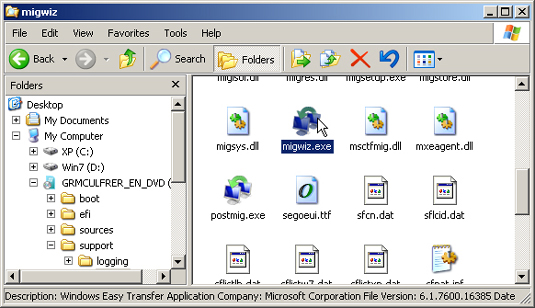
If your Windows 7 DVD hops to the screen every bit shortly as you insert it into your PC's bulldoze, press shut its Installation window. Then click the Beginning button, choose My Reckoner, right-click your DVD bulldoze and choose Explore to find the Support folder that contains the Migwiz binder.
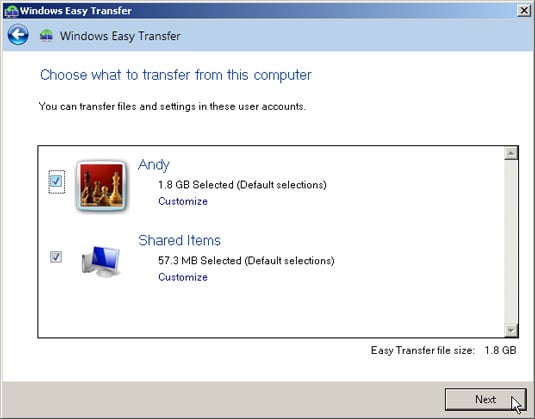
When the Windows Easy Transfer program runs, transfer the files and settings from each of your User Accounts to a portable hard drive. (The portable difficult drive should exist as big as the drive in your Windows XP PC.) Then unplug the portable drive and set up it aside for later. The portable drive tin serve every bit a backup drive after y'all get Windows 7 up and running.
-
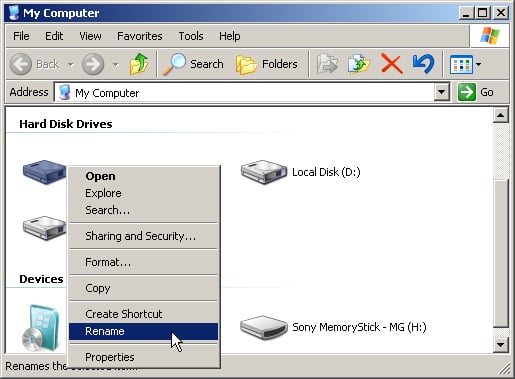
Rename your Windows XP drive.
This step isn't necessary, merely it helps yous place the correct drive a few steps later. Open the Get-go menu, choose My Computer, and correct-click your C drive. Choose Rename, type in XP, and printing Enter.
-
Insert the Windows 7 DVD into your DVD drive and restart your PC.
Your PC restarts, simply loads from the Windows 7 DVD. (You may accept to press a key to tell your PC to load from the DVD drive rather than the difficult bulldoze.)
If your hard drive is less than one-half full, don't restart your PC with the Windows 7 DVD in the bulldoze. Instead, install Windows seven while Windows XP is notwithstanding running. Skip Steps four and 9. And then, in Step 10, just click the Adjacent button. Windows 7 so stashes abroad your Windows XP files for possible retrieval in emergencies.
-
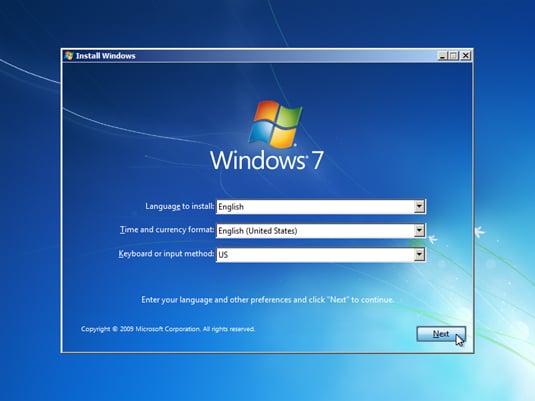
Click Side by side.
Clicking Side by side tells the program to install everything in English, including menu language, keyboard layout, and currency symbols.
-
Click the Install Now push button.
This tells Windows 7 to begin installing itself on your PC'due south difficult drive.
If asked, go online to fetch the latest updates to make your installation go smoothly.
-
Read the License Agreement, select the I Accept the License Terms cheque box, and click Next.
Clicking I Accept the License Terms cheque box and clicking Side by side ways you concur to Microsoft's lengthy legal terms.
-
Choose Custom (advanced).
If you effort to choose the Upgrade option, the program says to load Windows XP and then run the Installation DVD. (And and so, when yous return to this screen and click Upgrade, information technology says you tin't upgrade direct to Windows seven from Windows XP.)
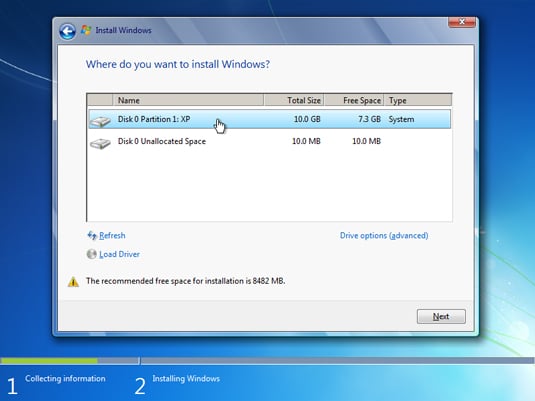
Clicking the Custom (advanced) option shows you a window listing your PC'due south partitions and/or drives.
-
Click your Windows XP bulldoze.
Your Windows XP drive will have the letters XP in its proper name from Step two.
-
Click Drive Options (Advanced).
Clicking Drive options, (advanced) lets y'all prepare your hard bulldoze to make room for Windows 7.

-
Click Format, and click OK to approve the format procedure. Then click Next.
Clicking Format and clicking OK, completely erases your copy of Windows XP and all of your data on that sectionalization. There's no going back after you finish this step, so brand certain you've backed upwardly your Windows XP files in Step ane.
Click Side by side when the format has finished and Windows 7 begins installing itself on your onetime Windows XP drive. This takes near 10 to xxx minutes on most PCs, and ends with Windows vii restarting your PC.
-
Enter your user proper name, and a proper noun for your PC, and click Adjacent.
When Windows 7 returns to the screen, type in your same user account name and computer name yous did on your Windows XP PC. Or, brand up new names, if you lot prefer.
-
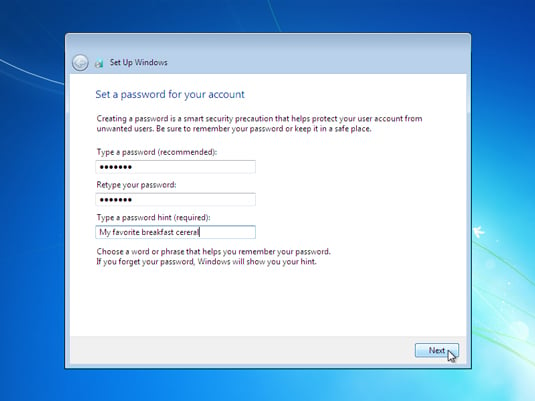
Type and retype in a password, then type in a password hint, and then click Side by side.
The password hint should be a phrase that reminds you lot of your countersign, but doesn't give it abroad. For example, if your password is the proper noun of your elementary school, the password hint could be, "My first unproblematic school."
-
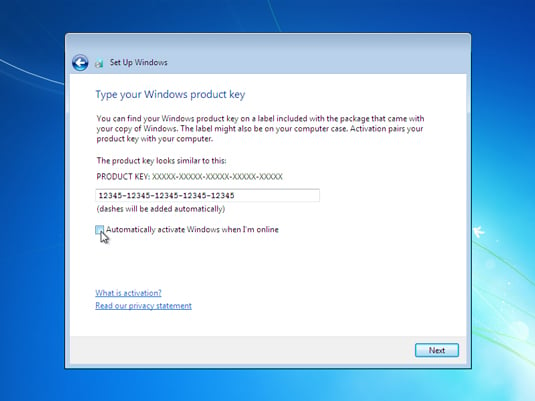
Type your production primal and click Next.
The production primal usually lives on a little sticker affixed to the CD'southward packaging. (If you're reinstalling a version of Windows vii that came pre-installed on your PC, wait for the production cardinal printed on a sticker affixed to the side or back of your PC.)
Don't select the Automatically Activate Windows When I'chiliad Online check box. Yous can practise that later when you know Windows 7 works on your PC. (You lot must enter the product key and activate Windows vii within xxx days of installation; Windows 7 nags you incessantly as the deadline approaches.)
Write your product fundamental on top of your Windows vii DVD with a felt-tip pen. (Write on the side of the disc that'southward printed.) That way, yous'll always have your valid production cardinal with your disc.
Windows 7's Activation characteristic takes a snapshot of your estimator's parts and links it with Windows 7's series number, which prevents you from installing that aforementioned copy onto another computer. Unfortunately, the Activation feature may also hassle you if you change a lot of parts in your computer, forcing you to call Microsoft and explain the state of affairs.
-
Choose Utilise Recommended Settings.
The Recommended Settings permit Windows to visit the Internet to update itself with security patches, warn you of suspicious Web sites, check for troubleshooting information, and send technical information to Microsoft to fine-tune Windows' performance.
-
Confirm the fourth dimension and date settings so click Side by side.
Except for the time zone, Windows vii usually guesses these correctly.
-
If you're connected to a network, choose your PC's location.
Windows 7 gives you options: Home, Piece of work, or a Public.
If you cull Dwelling house or Work, Windows 7 eases upwards on the security a bit, letting the PCs on the network see each other. If you're in a public setting, though, choose Public. Windows vii keeps your PC more secure by not letting other PCs share any of its files.
Later rummaging around inside your PC for a few more than minutes, Windows seven appears on the screen. Simply don't balance nevertheless; run through the following steps to complete the process:
-
Visit Windows Update to download whatsoever security patches and updated drivers issued by Microsoft.
To run Windows Update, click the First push button, cull All Programs, and click Windows Update.
-
Run Windows Easy Transfer.
Re-create your backed-upwards files and settings from your portable hard drive back onto your onetime PC.
-
Reinstall your former software from their original discs.
You lot may need to supervene upon old software with newer versions or drop by the manufacturer's Web site to run across whether they offer gratuitous updates.
-
Cheque your PC's user accounts.
Make certain that your PC's user accounts work correctly, and that the files and settings went to the right accounts.
-
Welcome to Windows seven!
Nearly This Article
This article is from the book:
- Windows vii For Dummies ,
This article can be found in the category:
- Windows 10 ,
Source: https://www.dummies.com/article/technology/computers/operating-systems/windows/windows-10/how-to-clean-install-windows-7-over-windows-xp-195766/
Posted by: bojorquezfrichis1979.blogspot.com
0 Response to "How To Uninstall Windows 7 And Go Back To Xp"
Post a Comment