

How To Find Baud Rate Of Serial Port Windows
Contributors: 

Series Terminal Overview
COM ports. Baud rate. Menstruum command. Tx. Rx. These are all words that get thrown effectually a lot when working with electronics, especially microcontrollers. For someone who isn't familiar with these terms and the context in which they are used, they tin can exist confusing at times. This tutorial is here to help you sympathise what these terms mean and how they form the larger motion picture that is series communication over a last.
In curt, serial terminal programs make working with microcontrollers that much simpler. They allow you lot to encounter data sent to and from your microcontroller, and that data can exist used for a number of reasons including troubleshooting/debugging, advice testing, calibrating sensors, configuring modules, and data monitoring. Once you have learned the ins and outs of a concluding application, it can be a very powerful tool in your electronics and programming arsenal.
Covered in this Tutorial
There are lots of different concluding programs out there, and they all have their pros and cons. In this tutorial we will hash out what a concluding is, which final programs are best suited for certain situations and operating systems, and how to configure and use each program.
Suggested Reading
Y'all should exist familiar with these topics before diving into this tutorial. If you lot need a refresher, feel free to pop on over to these links. Nosotros'll be right here waiting.
- Series Communication
- Analog vs Digital
- Binary
- Hexadecimal
- ASCII
- Installing FTDI Drivers
- RS-232 vs TTL Serial Communication
- Logic Levels
- Connector Basics particularly the USB section
What is a Terminal?
Final emulators get by many names, and, due to the varied employ of the word terminal, in that location can often be some defoliation about what someone means when they say last. Let'south clear that up.
Brief History
To understand the use of the give-and-take last, we must visit the not then distant by. Dorsum when computers where big, bulky, and took upwards entire rooms, there were just a handful of means to interface with them. Punch cards and newspaper tape reels where 1 such interface, only at that place was besides what was known equally a terminal that was used for inbound and retrieving data. These terminals came in many form factors, just they soon began to resemble what would go their personal computer descendants. Many consisted of a keyboard and a screen. Terminals that could display text only were referred to every bit text terminals, and later came graphical terminals. When discussing concluding emulators, it's these last of days past that are existence referenced.
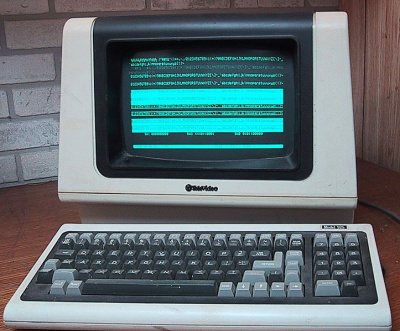
An OG terminal
Modern Terminals
Today, final programs are "emulating" the experience that was working on one of these terminals. They are known as emulators, applications, programs, terms, TTYs, and so on. For the purposes of this tutorial, just the discussion terminal will be used. Many terminals utilize to emulate specific types of reckoner terminals, simply today, most terminals are more generic in their interface.
When working on a modernistic operating organization, the word terminal window will often exist used to describe working within one of these applications. And, often, when reading other tutorials and hookup guides, you volition exist requested to open up a terminal window. But know that means to open whichever one of these terminals programs strikes your fancy.
It is also worth noting that many terminal programs are capable of much more but series advice. Many have network advice capabilities such every bit telnet and SSH. However, this tutorial will not cover these features.
Last vs Command Line
A final is not a command prompt, though the two are somewhat similar. In Mac OS, the command prompt is even called Terminal. Hence the confusion when using that give-and-take. Regardless, you can perform some of the same tasks in a command prompt that you could likewise perform inside a concluding window, but information technology doesn't work the other fashion around; you cannot result command line statements within a terminal window. We volition become over how to create a serial final connectedness within a control line interface later in this tutorial. For now, just know how to distinguish between the 2.
Basic Terminology
Hither are some terms yous should be familiar with when working within a serial terminal window. Many of these terms are covered in a lot more than detail in our Series Communication tutorial. Information technology highly recommended that you read that page too to become the total picture.
ASCII - Short for the American Standard Code for Data Interchange's character encoding scheme, ASCII encodes special characters from our keyboards and converts them to 7-bit binary integers that tin can be recognized past a number of programs and devices. ASCII charts are very helpful when working with serial terminals.
Baud Rate - In brusk, baud rate is how fast your information is being transmitted and received. 9600 is the standard rate, merely other speeds are typical amidst certain devices. But call up that all the links in your chain of communication have to be "speaking" at the same speed, otherwise data will be misinterpreted on one terminate or the other.
Transmit (TX) - As well known as Data Out or TXO. The TX line on any device is at that place to transmit information. This should be hooked upwardly to the RX line of the device with which you would similar to communicate.
Receive (RX) - As well known as Information In or RXI. The RX line on whatsoever device is there to receive data. This should be hooked upward to the TX line of the device with which you would like to communicate.
COM Port (Serial Port) - Each device you connect to your computer volition exist assigned a specific port number. This helps to identify each device continued. In one case a device has a port assigned to it, that port will be used every time that device is plugged into the calculator.
Your device will show up on your computer as either COM# (if you're on a Windows auto) or /dev/tty.usbserial-######## (if yous're on a Mac/Linux figurer), where the #'s are unique numbers or alphabetic characters.
TTY - TTY stands for teletypewriter or teletype. Much like terminal is synonymous with the terminals of old, and so as well is teletype. These were the electromechanical typewriters used to enter information to the terminal and, thus, to the mainframe. When working with terminals on Mac and Linux, you lot will oft see tty used to represent a communication port rather than 'COM port'.
Data, Stop, and Parity $.25 - Each package of data sent to and from the final has a specific format. These formats can vary, and the settings of your terminal can be adapted accordingly to work with different packet configurations. One of the almost common configurations you'll see is eight-N-ane, which translates to 8 information $.25, no parity bit, and one stop bit.
Flow Control - Flow control is controlling the rate at which data is sent betwixt devices to ensure that the sender is non sending data faster than the receiver tin receive the data. In most applications used throughout these tutorials, y'all will not demand to use period control. The flow control may also be nowadays in the shorthand notation: eight-N-i-None, which stands for no flow command.
Railroad vehicle Render & Line Feed - Carriage render and line feed are the ASCII characters sent when you printing the enter key on your keyboard. These terms have roots from the days of typewriters. Wagon return meant the carriage property the paper would render to the starting point of that detail line. Line feed (aka new line) meant the carriage should move to the next line to prevent typing over the previous line.
When typing on a modern keyboard, these terms still utilise. Every time you press enter (or return) you are telling your cursor to move downwards to the next line and move to the beginning of that new line.
Consulting our handy-dandy ASCII table, we can see that the grapheme for line feed is 10 (0x0A in hex) and carriage render is 13 (0x0D in hex). The importance of these 2 characters cannot be stressed plenty. When working in a terminal window y'all'll oftentimes demand to exist enlightened of which of these two characters, if not both, are being used to emulate the enter fundamental. Some devices only need one grapheme or the other to know that a control has been sent. More chiefly, when working with microcontrollers, exist enlightened of how you are sending information. If a string of five characters needs to be sent to the micro, yous may need a string that can actually agree 7 characters on account of the ten and 13 sent after every command.
Local Repeat - Local echo is a setting that can be inverse in either the serial terminal or the device to which you are talking, and sometimes both. This setting just tells the terminal to print everything you type. The benefit from this is being able to run across if you are in fact typing the right commands should you encounter errors. Exist aware, though, that sometimes local repeat tin can come up dorsum to bite you. Some devices will translate local repeat as double blazon. For example, if you type hello with local echo on, the receiving device might encounter hheelllloo, which is likely non the right command. Nearly devices tin can handle commands with or without local repeat. But be enlightened that this tin exist an issue.
Series Port Contour (SPP) - The Series Port Profile is a Bluetooth profile that allows for serial communication between a Bluetooth device and a host/slave device. With this contour enabled, yous can connect to a Bluetooth module through a serial terminal. This can be used for configuration purposes or for communication purposes. While not exactly pertinent to this tutorial, it's nevertheless skillful to know about this profile if you desire to use Bluetooth in a project.
Connecting to Your Device
At present that you know what a terminal is and the lingo that comes with the territory, it'south fourth dimension to hook up a device and communicate with it. This page volition testify you how to connect a device, how to discover which port information technology has been assigned, and how to communicate over that port.
What Y'all'll Need
For this example you'll need
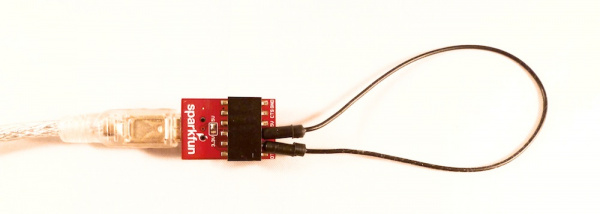
- An FTDI Basic - 5V or 3.3V will work fine. You tin can also use an FTDI Cablevision if that's all yous have.
- A USB Mini-B Cable - (Non necessary if you lot take an FTDI Cablevision.)
- A jumper wire - Virtually FTDI products have female person headers, then a male person-to-male jumper cable should suffice. Or, you lot could just use a piece of wire that is stripped on both ends.
Discovering Your Device
Once you have all your supplies ready, attach the FTDI Basic to the USB cable, and attach the cablevision to your computer. If this is the get-go time you've plugged in a device of this nature into your computer, you may demand to install the drivers. If this is the case, visit our FTDI Driver Installation Guide. If the drivers are all up to engagement, deport on.
Depending on which operating system you're using, there are a few different means to discover which port your device has been assigned.
Device Manger (Windows)
No matter which version of Windows you take, you have a plan chosen Device Manager. To open device manger, open the starting time card, and type
devmgmt.msc into the search bar. Press enter, and it'll open right up. Or, you can right-click on MyComputer, select Properties, and open the Device Manger from there (Windows vii). If y'all intend on using your computer to communicate with several serial devices, it may be worth creating a desktop shortcut to Device Manger.
Once you lot've got Device Manger open, expand the Ports tab. Hither is where the information we need lives.
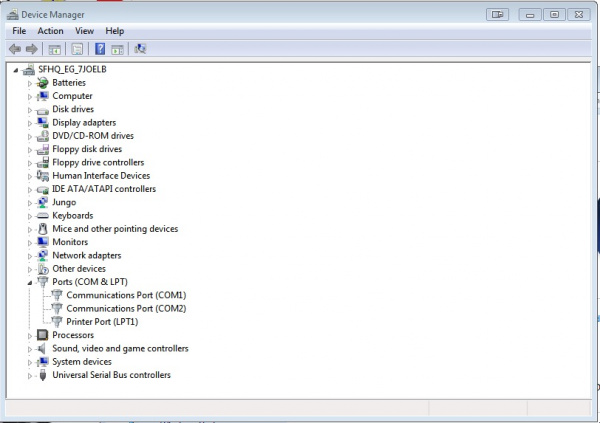
In this prototype, we have merely a few COM Ports showing upwards. The first matter to know is that COM1 is ALWAYS reserved for the true Serial Port, not USB. You know those grey, bulky cables, which accept a DB9 connexion on each end. Yeah, that serial port. Many computers (particularly laptops) no longer accept serial ports, and they are becoming obsolete in substitution for more than USB ports. Nevertheless, the OS still reserves COM1 for that port for people who however have an truthful serial port on their computer.
Another port that is likely to prove upwardly on near computers is LPT1. This is reserved for the parallel port. Parallel ports and cables are becoming even more obsolete than serial cables, but, once again, many computers all the same have these ports (they're often used to connect to printers) and have to adjust for that in the Bone.
With those out of the way, nosotros can focus on the ports that we do need to use. At present with your FTDI plugged in, you lot should see a new COM port become added to the list.
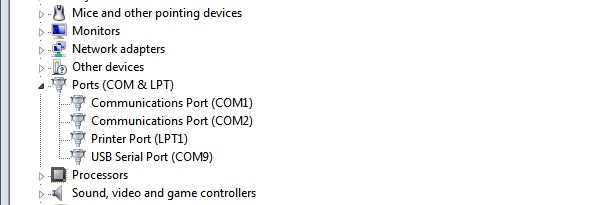
Typically, your computer will enumerate your devices. For instance, if this is the first serial advice device you've plugged into your figurer, it should enumerate every bit COM2. On my computer this is the not the first device I've plugged in, only rather the eighth, so it has enumerated as COM9 (don't forget most COM1).
What's important to know is that once a device has been associated with your reckoner and has had a port assigned to it, the figurer will remember that device every fourth dimension information technology'due south attached. And so, if you lot accept an Arduino board that has been assigned COM4 for example, information technology is not necessary to open up Device Manger and check which COM port it is on every time, because that device will now e'er be on COM4. This can be good and bad. Virtually people will never plug more than than a couple dozen serial devices into their computers. However, some people volition plug in lots of devices, and your computer can only assign so many ports (256 if I remember correctly). Thus, it may be necessary to delete some COM ports. We will talk over that in the tips and tricks department.
If you lot do accept multiple devices and are not sure which device is the one you but plugged in, unplug it, lookout man for whichever COM port disappears, so plug it back in. The COM port should reappear letting you know that'due south the device you're looking for.
1 last thing to mention is that all serial devices, even if they crave different drivers, will show up as COM ports in Windows. For example, an Arduino Uno and the FTDI Basic both have different drivers and are technically ii unlike types of devices. Windows doesn't discriminate. It will treat both devices the same, and all you lot have to worry about is with which COM port it'south associated. Mac Bone and Linux treat this slightly differently. Read on to find out.
Control Line (Mac, Linux)
Similar to Windows, Mac Bone and Linux assign a specific port to every device attached to the computer. Still, unlike Windows, there is no specific plan you can open upward to view all the devices currently attached. Accept no fear. There is all the same a unproblematic solution to detect you device.
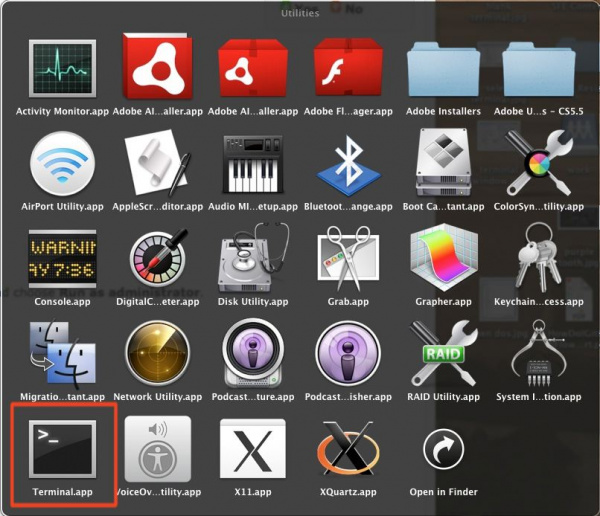
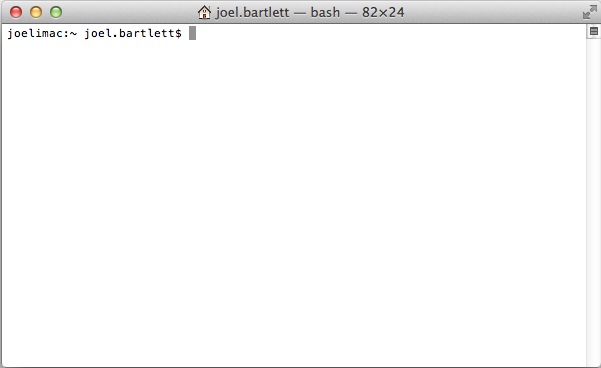
The default command line interface for Mac Bone 10 is Terminal. To open information technology, go to your Utilities folder. There you lot should see the icon for Final. I'grand going to assume that if you're using Linux, you lot already know how to open up a command line window.
In one case open, you should run across the typical terminal screen.
To encounter a list of all the available Serial ports on both Mac and Linux, type this command:
ls /dev/tty.* You lot should now meet a list of all serial ports on your computer.
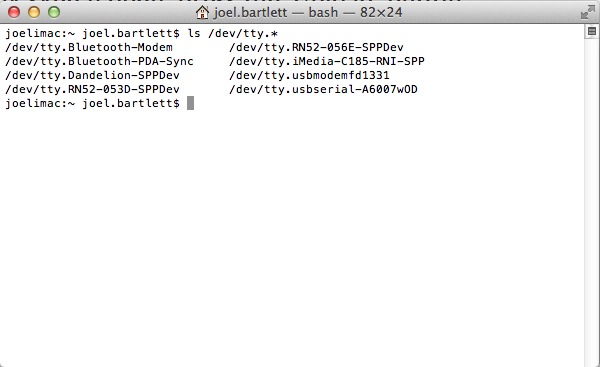
You'll notice a few Bluetooth ports on there. I have several Bluetooth devices paired with my figurer, then yous may have more or less devices that show upwardly depending on what devices take been paired with your computer. (Notice the SPP portion of these names. That indicates that Bluetooth device can talk to the serial terminal every bit well.)
The important devices to note are the tty.usbserial and the tty.usbmodem. For this case I have both an FTDI Bones and an Arduino Uno plugged into my computer. This is simply to show yous the key difference between the two. As mentioned before, some devices are treated differently depending on how they communicate with the computer. The FT232 IC on the FDTI basic is a truthful serial device, and, thus, it shows up every bit usbserial. The Uno on the other hand, is an HID device and shows up every bit a usbmodem device. The HID (Human Interface Device) contour is used for keyboards, mice, joysticks, etc., and, as an HID device, the figurer treats information technology slightly different despite the fact that is can still send serial data. In either case, these tty.usb______ ports are what we're after when connecting to a serial last.
Repeat Examination
With that out of the fashion, it'southward fourth dimension to actually communicate with the FTDI. The specifics of each terminal program will exist discussed in the following sections. This example volition be shown in CoolTerm, only be aware that this can be washed with any last.
Open upwardly a terminal with the correct settings: 9600, 8-Northward-i-None.
Brand sure local repeat is turned off for this test.
Take your jumper wire and connect it to the TX and RX lines of the FTDI Bones.
Now type!

Everything y'all blazon should be displayed in the concluding window. It's nothing fancy, but you are now communicating with the final. Data is being sent from your keyboard, to the computer, through the USB cable to the FTDI, out the FTDI'south TX pivot, into the RX pin, back through the USB cable, into the calculator, and is finally displayed in the terminal window. Don't believe me? Unplug the jumper and type some more. Awaiting you did turn local repeat off, you should non encounter anything being typed. This is the echo test.
Extra Credit
If you have 2 FTDI boards or other like serial devices, endeavor hooking up both of them. Connect the TX line of one to the RX line of the other and vise versa. And then, open two serial last windows (aye, you can have multiple last windows open at once), each connected to a different device. Make sure they are both set to the same baud rate and settings. Then connect, and start typing. What y'all blazon in ane terminal should prove up in the opposite concluding and vise versa. You've simply created a very simplistic chat customer!
Now let's explore the different final programs.
Arduino Serial Monitor (Windows, Mac, Linux)
The Arduino Integrated Development Environment (IDE) is the software side of the Arduino platform. And, because using a terminal is such a big part of working with Arduinos and other microcontrollers, they decided to included a serial terminal with the software. Within the Arduino environment, this is chosen the Serial Monitor.
Making a Connection
Serial monitor comes with any and all version of the Arduino IDE. To open up it, simply click the Serial Monitor icon.

The icon is located to the right of the other icons in Arduino 0023 and below.
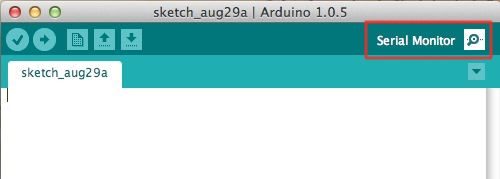
The icon is located to the far correct in Arduino ane.0 and beyond.
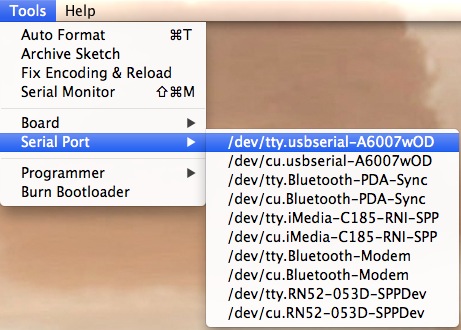
Selecting which port to open in the Serial Monitor is the same as selecting a port for uploading Arduino code. Go to Tools -> Serial Port, and select the correct port.
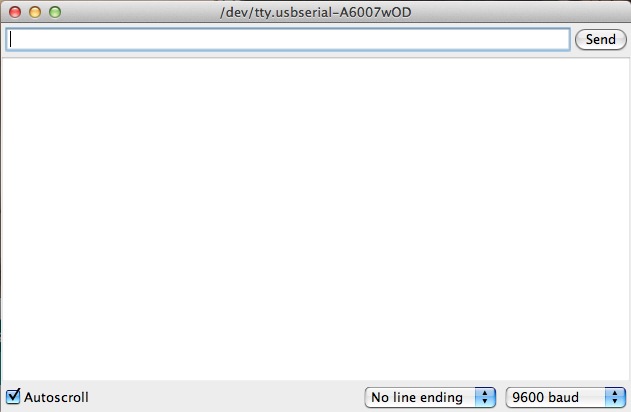
Once open up, yous should see something like this:
Settings
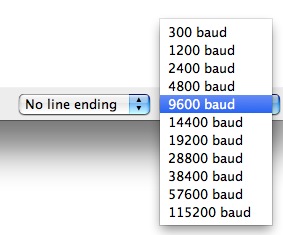
The Series Monitor has limited settings, just enough to handle about of your serial communication needs. The get-go setting you can modify is the baud rate. Click on the baud rate drop-downward card to select the the correct baud rate.
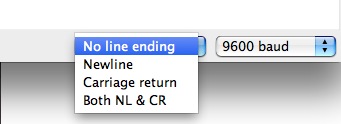
You can also change the enter key emulation to carriage return, line feed, both, or neither.
Last, you tin the the last to autoscroll or not by checking the box in the lesser left corner.
Pros
- The Serial Monitor is a great quick and easy way to institute a series connectedness with your Arduino. If you lot're already working in the Arduino IDE, at that place's really no need to open upwardly a divide concluding to display data.
Cons
- The lack of settings leaves much to be desired in the Series Monitor, and, for advanced serial communications, it may not do the trick.
Hyperterminal (Windows)
HyperTerminal is the defacto last program for any Windows Bone up to XP -- Windows Vista, 7, and eight don't include it. If you're on Windows Vista, 7, or 8, and really just accept to accept HyperTerminal, a little scouring of the Internet should plow up some workarounds. Ameliorate alternatives are more easily available even so- we'll get to those soon.
If yous're on a pre-Vista machine, and only accept HyperTerminal to work with, here are some tips and tricks for using it:
Initiating a Connectedness
When initially opening up HyperTerminal, it will present yous with a "Connection Description" dialog. Enter any name you lot delight, and, if you really desire to get fancy, select your favorite icon. So striking "OK". (If this window didn't pop upwards go to File > New Connexion to open it.)
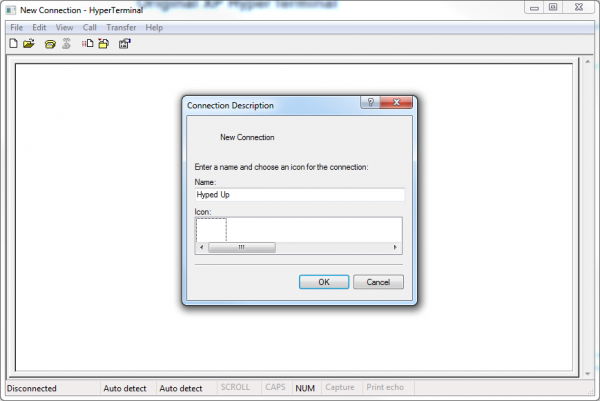
None of the settings in this first window accept whatever issue on the series communication.
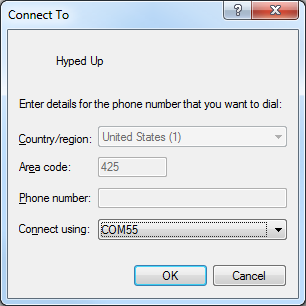
On the next window, ignore the first three text boxes -- we're non working with a dial-up modem here. Do select your COM port next to the "Connect using" box. And then hitting "OK".
The settings on the next box should look pretty familiar. Make sure the "Bits per 2nd" dropdown is set to the correct baud rate. And verify that all of the other settings are correct. Hit "OK" once everything looks correct there.
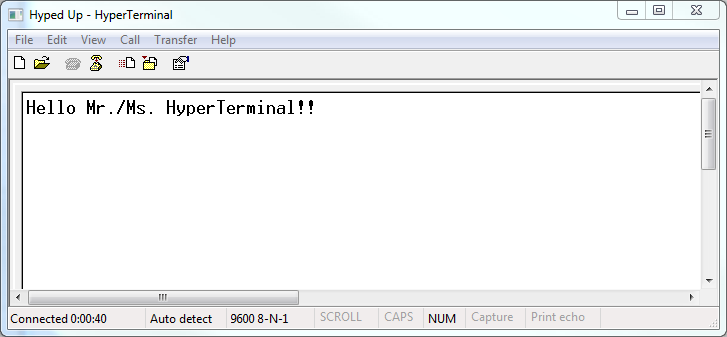
Information technology doesn't expect like much, but you now take an open concluding! Type in the blank white area to send data, and annihilation that is received by the terminal volition evidence up there as well.
Adjusting Settings
There are some limited adjustments we tin can brand to the HyperTerminal UI. To notice them, get to File > Properties. Under the "Settings" tab you lot'll encounter about of the options.
If y'all want to come across what you're typing in the terminal, yous tin turn on local echo. To flip this switch, hit the "ASCII Setup" button, then cheque "Echo typed characters locally".
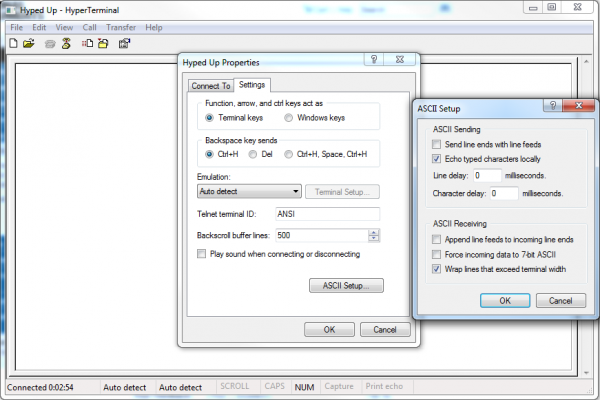
The other settings are very specific to formatting how characters are sent or received. For most cases they should be let be.
Those who accept used HyperTerminal have either come to accept it for what it is, or sought out some other -- whatever other(!) -- terminal program. Information technology's not great for series communication, just it does work. Let's explore some of the better alternatives!
Tera Term (Windows)
Tera Term is one of the more than popular Windows concluding programs. It's been effectually for years, it'south open up source, and it's simple to utilise. For Windows users, it'south one of the best options out there.
You tin download a copy from hither. In one case you take Tera Term installed, open information technology up, and let'south poke around.
Making a Connection
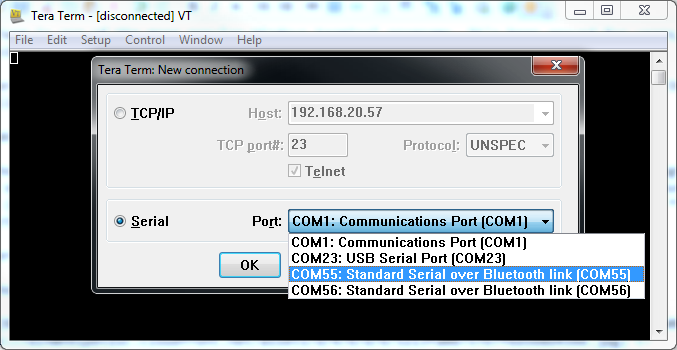
Yous should initially be presented with a "TeraTerm: New connection" pop-up within the program. Here, yous can select which serial port you'd like to open up. Select the "Serial" radio push button. Then select your port from the drop-downwards carte du jour. (If this window doesn't open when you starting time TeraTerm, yous can go here by going to ****File > New connection..."**.)
That'll open up the port. TeraTerm defaults to setting the baud rate at 9600 bps (viii-N-1). If you need to adjust the serial settings, go upwards to Setup > Serial Port. You'll run into a window pop upwardly with a lot of familiar looking serial port settings. Adjust what you need to and striking "OK".
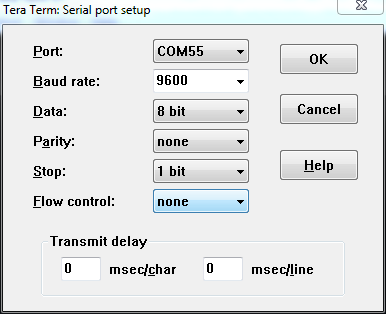
The title of your TeraTerm window should change to something similar "COM##:9600baud" -- good sign.
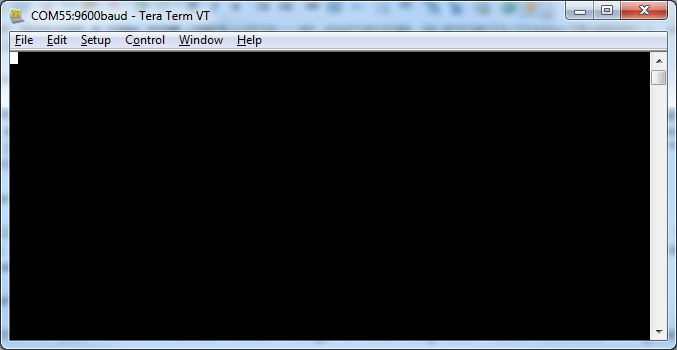
That'southward about all there is to it. The blank window with the blinking cursor is where data is both sent (by typing it in) and received.
TeraTerm Tips and Tricks
Local Repeat
It can be weird to blazon stuff in the window and non see it show up in the last. It'due south undoubtedly nevertheless flowing through the serial terminal to your device, but information technology can be difficult to type when you don't have whatsoever visual feedback for exactly what you're typing. You can turn on local echo by going to the Setup card and selecting Final.
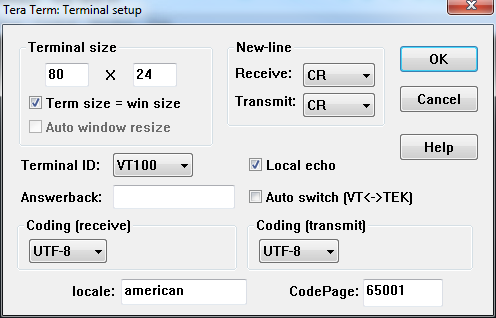
Check the Local repeat box if you'd like to turn the feature on.
There are other settings to be made in this window too. You lot can adjust the size of the terminal (the values are in terms of characters per row/column), or adjust how new-lines are displayed (either a carriage render, line feed, or both).
Clear Buffer and Clear Screen
If you want to clear your last screen you can use either the "Clear buffer" or "Clear screen" commands. Both are located under the Edit menu.
Clear screen will practice just that, blank out the concluding screen, but whatsoever data received will even so be preserved in the buffer. Scroll upwardly in the window to accept another expect at it. Clear buffer deletes the entire buffer of received data -- no more data to scroll upwardly to.
Shortcut Keys
Menus are a pain! If you desire to get really fast with TeraTerm, remember some of these shortcuts:
- ALT+North: Connects to a new serial port.
- ALT+I: Disconnects from the current port.
- ALT+V: Pastes text from clipboard to the serial port (not CTRL+V).
- ALT+C: Copy selected text into clipboard (not CTRL+C).
- CTRL+TAB: Switch between two TeraTerm windows.
Existent-Term (Windows)
TeraTerm is awesome for simple ASCII-simply serial concluding stuff, but what if y'all need to send a cord of binary values ranging from 0-255? For that, we similar to utilize RealTerm. RealTerm is designed specifically for sending binary and other hard-to-type streams of information.
RealTerm is bachelor to download on their SourceForge page.
Setting Upwards the Series Port
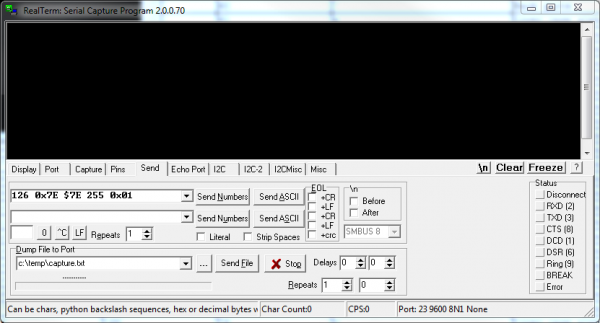
When you open up RealTerm, you'll be presented with a bare window like below. The top half is where you lot'll type information to send, and it'll also display data received. The bottom one-half is split up into a number of tabs where we adjust all of the settings.
Allow's get continued! To begin, navigate to the "Port" tab. On the "Port" dropdown here, select the number of your COM port. Then, make sure the baud rate and other settings are correct. You can select the baud rate from the dropdown, or type information technology in manually.
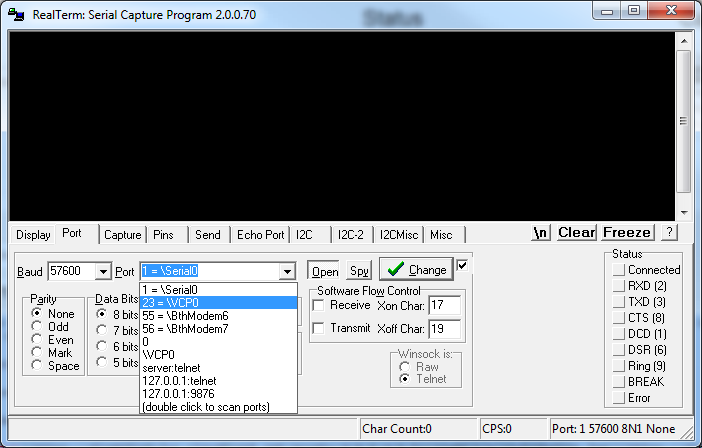
With all of those settings adjusted, you'll take to click "Open" twice to close and re-open the port (clicking "Change" doesn't piece of work until after you lot've established a connectedness on a COM port).
That'due south all there is to that! Type stuff in the black ether above to send information, and anything received past the terminal will pop up there too.
Sending Sequences of Values
The power to send long sequences of binary, hexadecimal, or decimal values is what really sets RealTerm autonomously from the other last programs we've discussed.
To access this function, head over to the "Transport" tab. Then click into either of the two text boxes side by side to "Send Numbers". This is where you enter your number sequence, each value separated by a infinite. The numbers can be a decimal value from 0 to 255, or a hexadecimal value, which are prefixed with either a "0x" or a '$'. One time you lot take your string typed out, hit "Send Numbers" and abroad they go!
Why would you lot need this yous ask? Well, let'south say you had a Serial Seven Segment Display hooked upwards to an FTDI Basic, which is connected to your estimator. This is a pretty cool setup -- y'all can command a 7-segment display by simply typing in your terminal. But what if you wanted to dim the display? You'd need to transport two sequential bytes of value 123 and 0. How would you exercise that with the scattering of keys on a keyboard? Consulting an ASCII table to match binary values to characters, you'd have to printing DEL for 127 and CTRL+SHIFT+2 (^@) for 0...or merely use the "Send" tab in RealTerm!
Adjusting the Brandish
But as you lot can utilize RealTerm to transport literal binary values, you can also utilise information technology to display them. On the "Brandish" tab, under the "Display As" section are a wide assortment of last display choices. You can accept information coming in displayed equally standard ASCII characters, or you can have them show up as hex values, or any number of other display types.
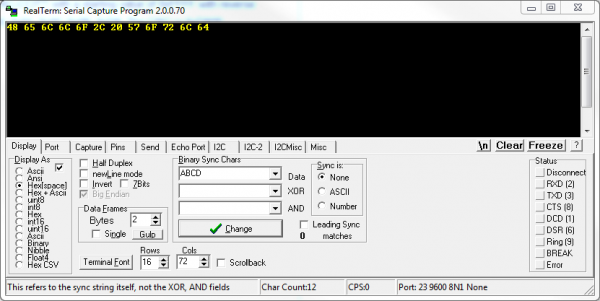
Incoming bytes are displayed as hexadecimal values. Can you decode the secret message?!
RealTerm is preferred for more advanced last usage. Nosotros'll use it when we need to send specific bytes, but for more basic terminal applications, TeraTerm is our go-to emulator.
YAT - Even so Another Concluding (Windows)
YAT is a convenient and feature-rich serial terminal. It features text as well as binary communication, predefined commands, a multiple-document user interface and lots of extras.
YAT is available to download at SourceForge.
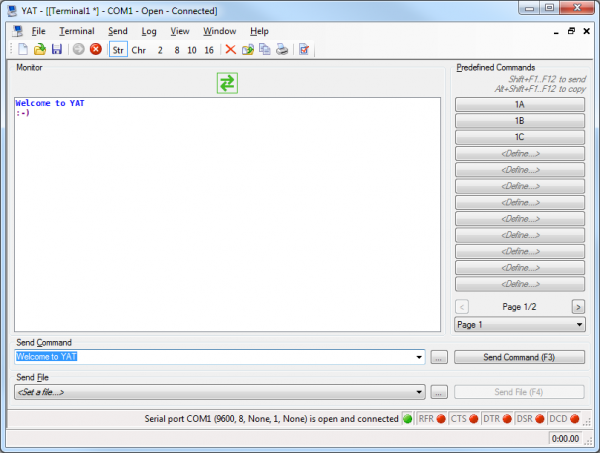
Appearance
YAT features a multiple-document user interface (MDI) that consists of a single workspace with one or more terminals.
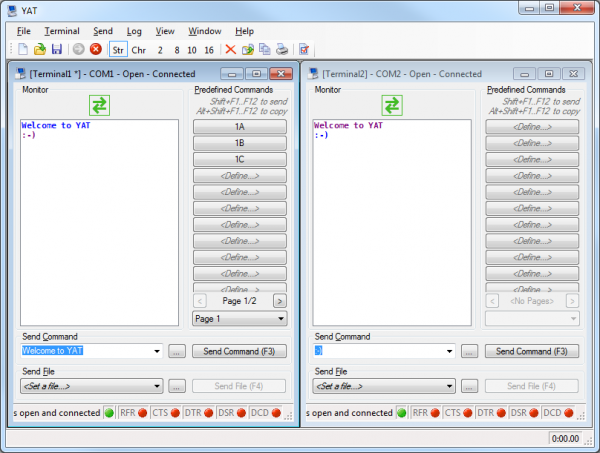
Workspace
Each terminal can be configured according to the device it shall be communicating with. These extra features brand a terminal especially easy to use:
- Text command console
- File control listing
- Unlimited number of predefined commands
- Drop-downwardly of recent commands
Each final has its own monitor to display approachable and incoming data. The view can be configured as desired:
- Time stamp
- Line number
- Finish-of-line sequence
- Line length
- Line and bytes transmission rate
- Chronometer
Most of these features can be enabled and configured, or hidden for a cleaner and simpler user interface.
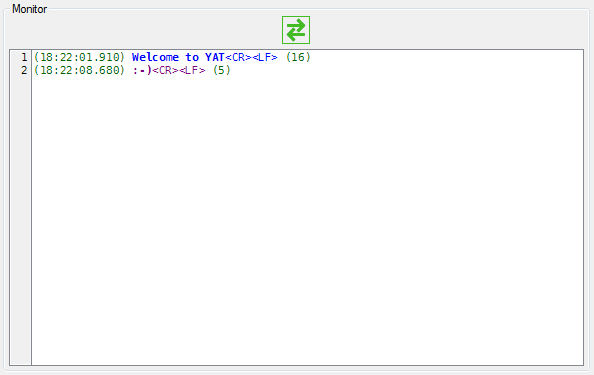
Detailed Monitor
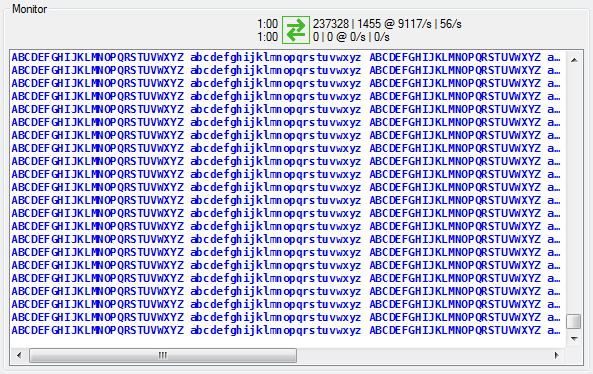
Monitor Status
Terminal Settings
- Text or binary advice
- Advice port type:
- Serial Port (COM)
- TCP/IP Client, Server or AutoSocket
- UDP/IP Socket
- USB serial HID
- Specifc settings depending on port type
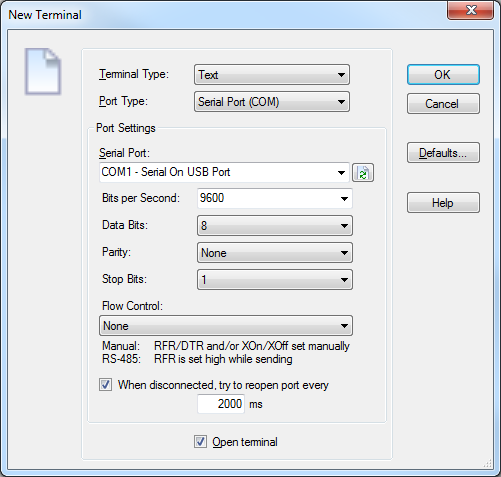
Serial COM Port Settings
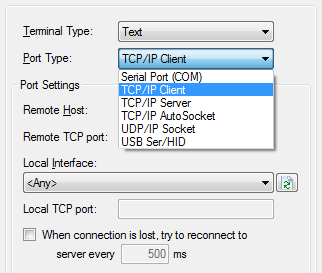
TCP and UDP Settings
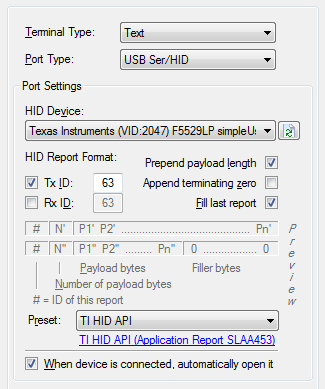
USB Series HID Settings
Text Terminal Settings
- Full support of whatever known ASCII and Unicode encoding
- End-of-line configuration
- Predefined and costless-text sequences
- Possibility to ascertain carve up EOL for Tx and Rx
- Send and receive timing options
- Grapheme substituion
- Annotate exclusion
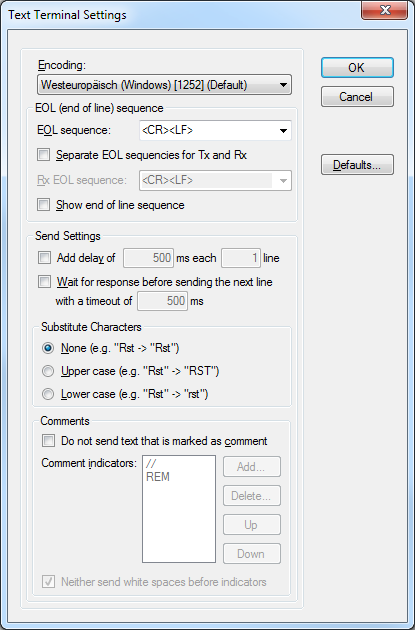
Text Terminal Settings
Binary Final Settings
- Configuration of protocol and line representation
- Possibility to define separate settings for Tx and Rx
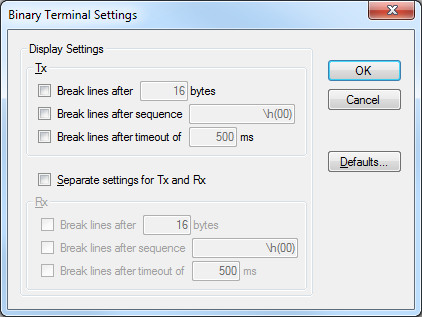
Binary Last Settings
Avant-garde Settings
- Various display options
- Various avant-garde communication options
- Specialized communication options for serial ports (COM)
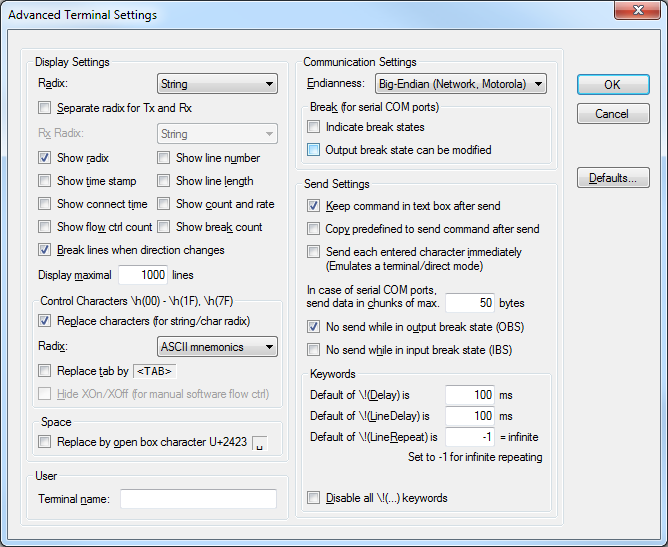
Advanced Settings
Extras
- Escapes for bin/october/dec/hex like
\h(4F 4B) - Escapes for ASCII controls like
<CR><LF>besides as C-manner\r\n - Special commands such as
\!(Delay),\!(LineDelay)and\!(LineRepeat) - Versatile monitoring and logging of sent and received information
- Formatting options for excellent readability
- Powerful keyboard operation including shortcuts for the about important features
- Versatile shell/PowerShell command line
- x86 (32-chip) and x64 (64-chip) distribution
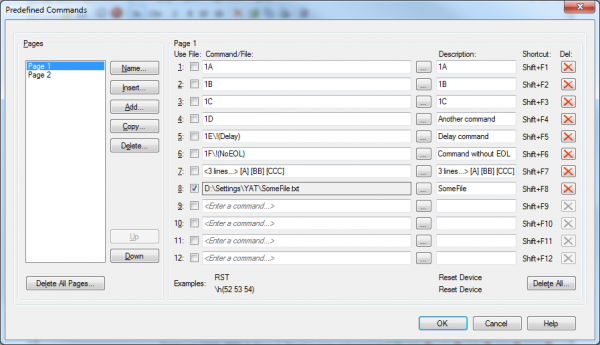
Predefined Commands
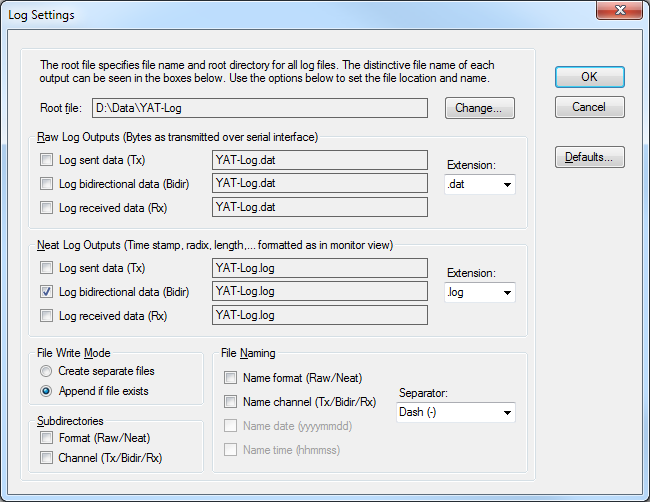
Log Settings
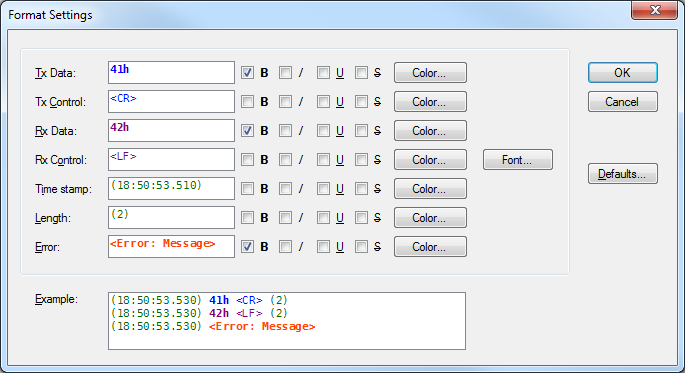
Monitor Format
Change Direction and Support
YAT is fully hosted on SourceForge. Characteristic Requests and Bug Reports tin be entered into the according tracker. Both trackers can be filtered and sorted, either using the predefined searches or the list view. Support is provided by a few simple helps integrated into the application, some screenshots on the SourceForge folio, and the project's email if none of the to a higher place can help.
Development
YAT is implemented in C#.Net using Windows.Forms. The source code is implemented in a very modular way. Utilities and I/O sub-systems can besides be used independent on YAT, due east.thousand. for any other .NET based application that needs series communication, command line handling or merely a couple of convenient utilities. Testing is done using an NUnit based test suite. Project documentation is done in OpenOffice. For more details and contributions to YAT, refer to Help > About.
CoolTerm (Windows, Mac, Linux)
CoolTerm is useful no matter which operating system y'all're using. Yet, it is specially useful in Mac OS where at that place aren't as many final options as there are in Windows.
Yous can download the latest version of CoolTerm hither.
Making a Connexion
Download and open a CoolTerm window.
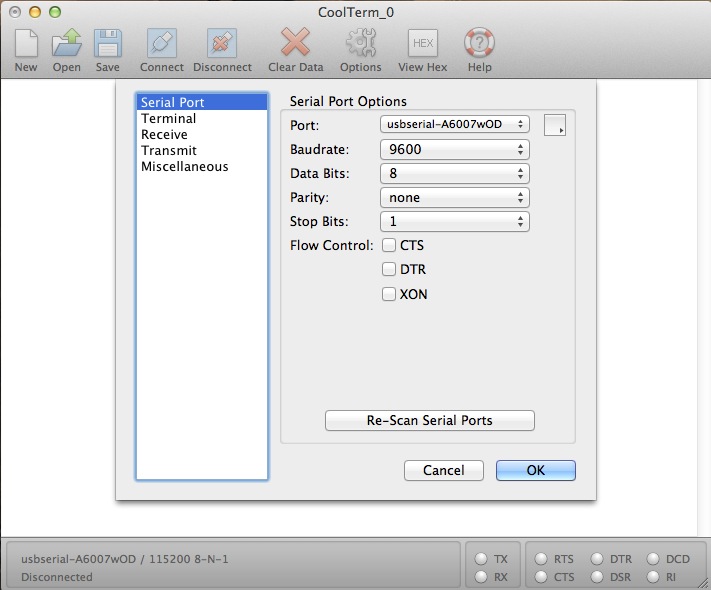
To change the settings, click the Options icon with the picayune gear and wrench. You'll be presented with this menu:
Here, you tin can select your port, baud rate, scrap options, and flow command.
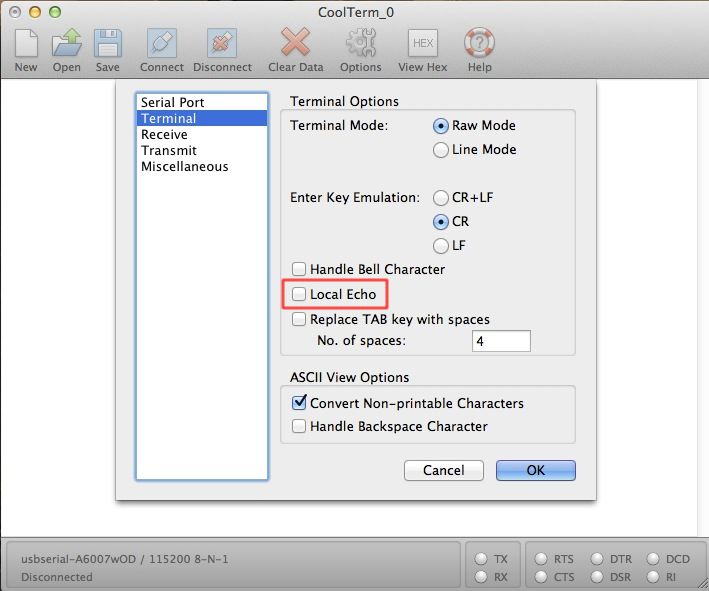
Now click on the Last tab on the left.
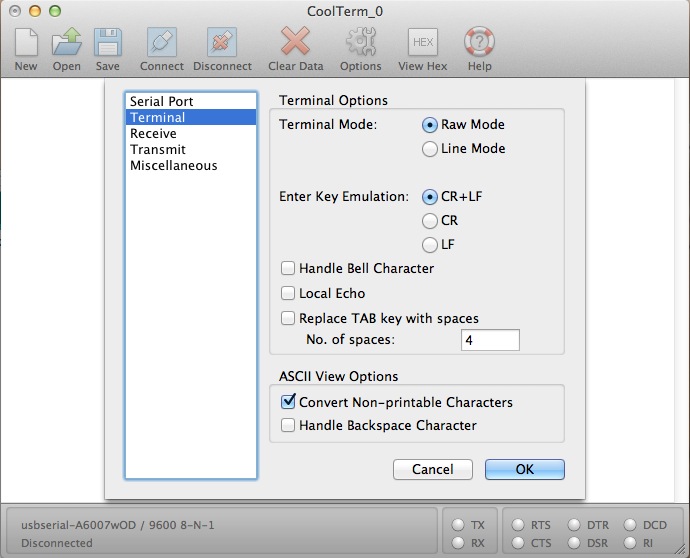
Here, you tin change the enter key emulation (carriage return/line feed), plough local echo off or on, and y'all can switch between line mode and raw mode. Line mode doesn't send information until enter has been pressed. Raw mode sends characters straight to the screen.
Once all your setting are correct, the Connect and Disconnect buttons will open and shut the connection. The settings and condition of your connection will be displayed in the bottom left corner.
If y'all need to articulate the information in the terminal screen, click the Clear Data icon with the large red 10 on information technology.
If you're getting annoyed with not being able to apply the backspace, turn on 'Handle Backspace Character' under the Terminal tab under Options.

Extended Features
Ane awesome feature of CoolTerm is Hex View. If you desire to run into the bodily hex values of the data you are sending rather than the ASCII values, Hex View is a tremendous assist. Click the View Hex icon. The terminal'south appearance will change slightly. Now whatever you lot blazon will evidence up every bit hex and ASCII. The first cavalcade is only keeping rails of line numbers. The second column is the hex values, and the terminal column is the actual ASCII characters you blazon.
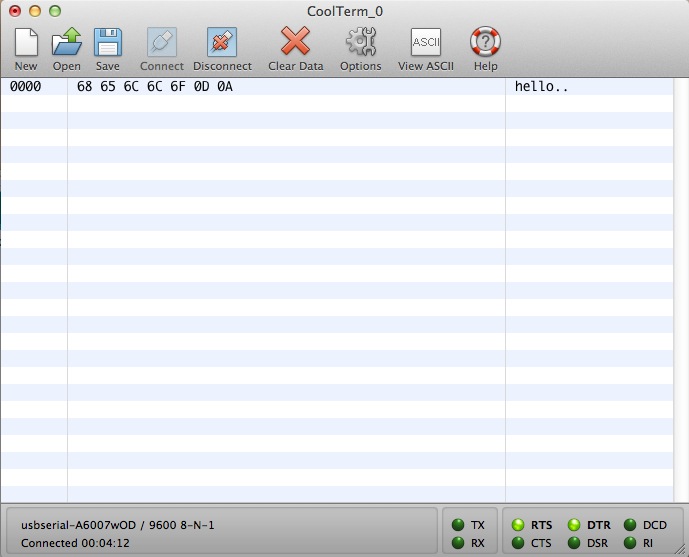
Here I've typed hullo and \
To get back to ACSII mode, click the View ASCII icon.
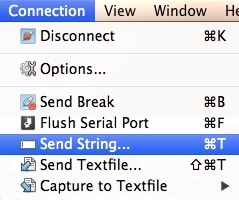
Y'all tin can besides use the Transport Cord option to send entire strings of text. In the connexion menu, select Send String.
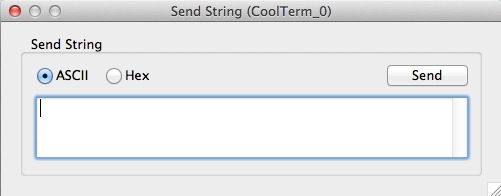
You should now accept a dialog box with which to send your string in hex or ASCII mode.
ZTerm (Mac)
You tin can download the latest version of ZTerm hither
ZTerm is some other final choice for Mac users. Compared to CoolTerm, information technology seems a lot less user friendly, still, once you find your style around, it's just as useful.
Making a Connection
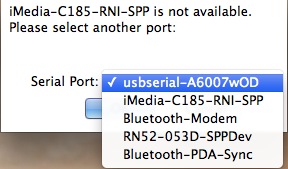
When you first open ZTerm, you be greeted with this prompt:
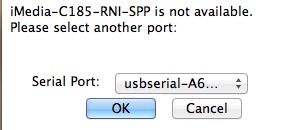
Choose the right port, and click OK.
Y'all should now take a blank concluding window.
*Notation: One time y'all've made a connectedness, ZTerm will open the most recent connectedness every time y'all run it. This can exist annoying if y'all have multiple connections available. To become around this car connect, agree down the SHIFT key equally you start ZTerm. This volition featherbed the auto connect and ask you to which port you'd like to connect.
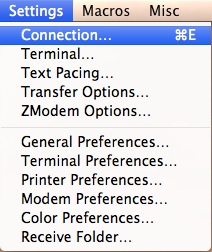
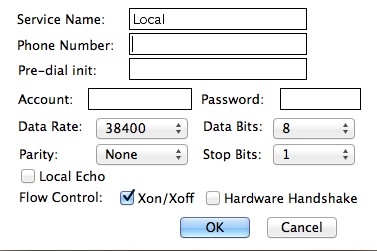
Once you're connected, you can change the final settings past going to Settings -> Connection.
Here you tin change the baud rate (data rate); parity, data, and finish bits; flow command; and plough local echo on or off.
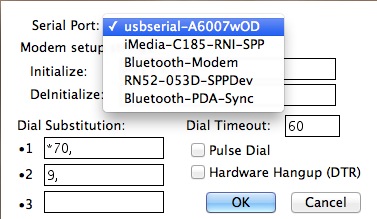
If you need to alter your port after establishing a connexion, become to Settings -> Modem Preferences.
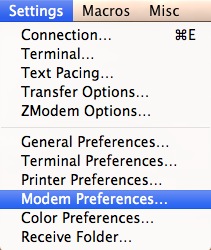
Choose the correct port under the Series Port dropdown carte.
Other Features
ZTerm has lots of other uses for network communication, but that is beyond the scope of this tutorial.
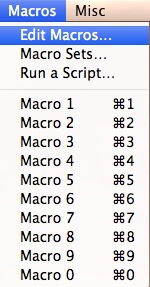
One squeamish feature that can be used is the macros. Become to Macros -> Edit Macros.
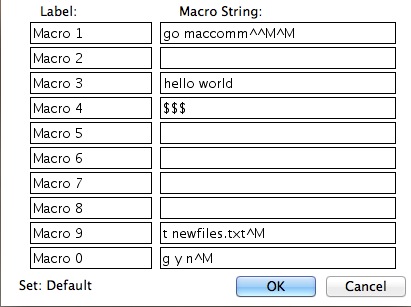
Here you can create macros that send whatever strings/commands you'd like. Have a command that y'all're typing constantly? Brand a macro for it!
Control Line (Windows, Mac, Linux)
Equally mentioned earlier, you tin can use command line interfaces to create series connections. The major limiting factor is the lack of connection options. Well-nigh of the programs nosotros've discussed so far accept a slew of options that y'all can tweak for your specific connexion, whereas the command line method is more than of a quick and muddied manner of connecting to your device in a compression. Here's how to achieve this on the three major operating systems.
Terminal and Screen (Mac, Linux)
Mac
Open up Terminal. See the Connecting to Your Device department for directions.
Now type ls /dev/tty.* to run into all available ports.
You can now use the screen command to to found a simple series connection.
Type screen <port_name> <baud_rate> to create a connection.

The last will go blank with simply a cursor. You lot are now continued to that port!
To disconnect, type control-a followed by command-\. The screen will and so ask if you are sure you want to disconnect.
In that location are other options yous can control from screen, however it is recommended that you but use this method if you are comfortable with the command line. Blazon man screen for a full list of options and commands.
Linux
The screen command can as well exist used in Linux. There are only a few variations from the Mac instructions.
If you do not have screen installed, get it with sudo apt-become install screen.
Making a connexion is the same every bit Mac.
To disconnect, blazon control-a then shift-k.
That's all in that location is to information technology.
MS-DOS Prompt (Windows)
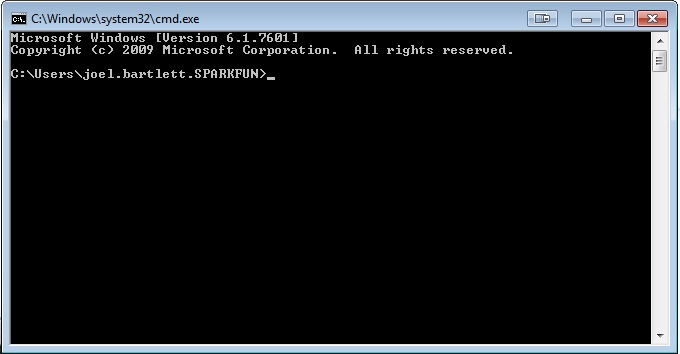
The fastest way to go to the command line in Windows is to click on the start bill of fare, type cmd into the search field, and press Enter.
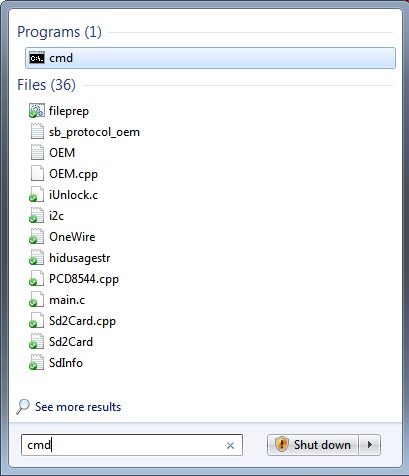
This will open up a blank MS-DOS command line prompt.
To be able to issue Serial commands, you must first enter PowerShell. Type powershell to get into PowerShell command mode.
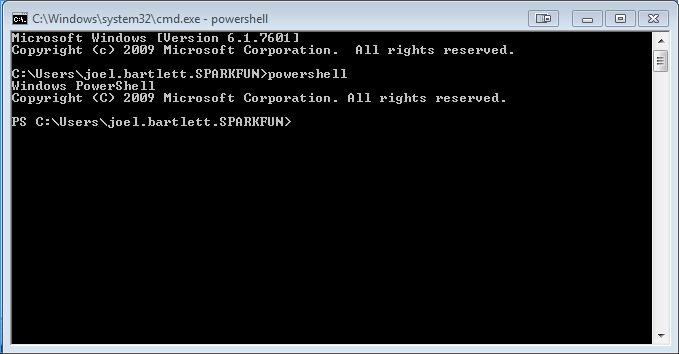
To run into a list of all the bachelor COM ports, type
[Arrangement.IO.Ports.SerialPort]::getportnames() You should now see something like this..

Now create an instance of the port y'all desire with this command
$port= new-Object System.IO.Ports.SerialPort COM#,Baudrate,None,8,one With that, you can now connect to and transport data to or from that COM port.
$port.open() $port.WriteLine("some cord") $port.ReadLine() $port.Shut() Over again, this method of series communication is only recommended for advanced command line users.
Tips and Tricks
Changing/Deleting COM Ports (Windows)
There may come a time when you demand a device to be on a specific COM port. An example of this is, in older versions of TeraTerm, yous could merely connect to COM ports 16 and below. Thus, if your device was on COM 17, you'd have to change it to connect to it. This trouble has been addressed in newer versions of TeraTerm, but in that location are many other programs out there that only allow a certain number of COM ports.
To get around this, we'll have to dive into Device Manger.
Open Device Manger, and expand the ports tab.

Now right-click on the port you desire to modify. Select Properties.
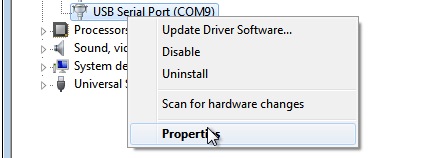
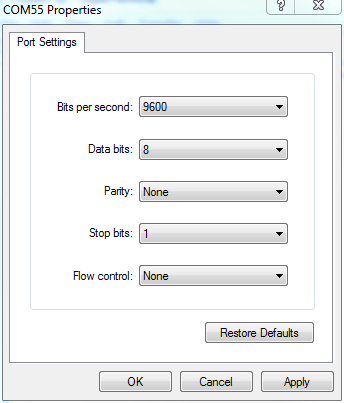
In Backdrop, go to Port Settings, and select Advanced.
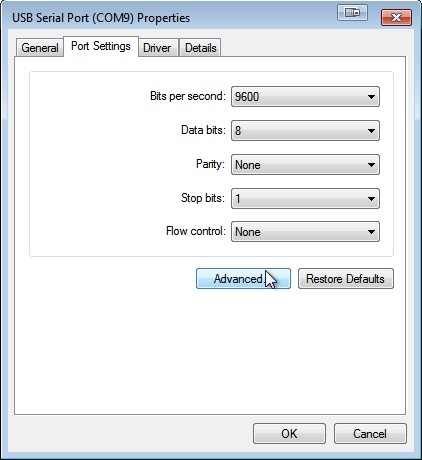
Here, you'll see a drop down menu with all the available COM ports in information technology. Some of them will have (in utilise) adjacent to them. These are the ports that take been assigned to a serial device.
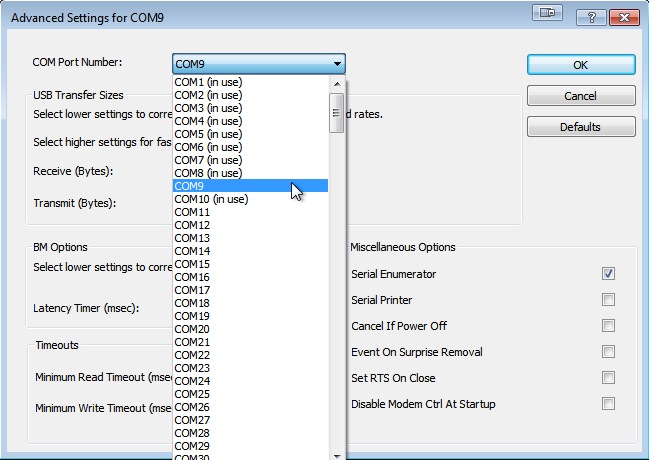
Notice that COM 9 doesn't accept an (in use) adjacent to it considering that is the port we are currently working with.
If we wanted to change COM 9 to COM 3, we simply select COM three in this card, and click OK. The (in use) next to COM 3 should go away. Whatever was connected to COM ix is at present associated with COM three, and whatever was associated with COM 3 has now been overwritten.
If you lot need to clear out some old COM ports, you can follow the steps above but for numerous COM ports.
Alert: Exercise not select COM i when cleaning up old ports. This trick is only for if you really need information technology and shouldn't be performed very ofttimes, for sanity's sake.
TTY vs CU (Mac, Linux)
In Unix and Linux environments, each serial communication port has two parts to it, a tty.* and a cu.*. When you await at your ports in say the Arduino IDE, you'll see both for one port.

The difference betwixt the two is that a TTY device is used to telephone call into a device/system, and the CU device (call-upwards) is used to call out of a device/arrangement. Thus, this allows for ii-way communication at the aforementioned time (total-duplex). This is more important to know if yous are doing network communications through a terminal or other plan, simply it is still a question that comes upward frequently. Just know that, for the purposes of this tutorial, always use the tty option for serial communication.
Cannot Connect to That Port!
You lot tin only accept one connexion to a particular port open at any given time (but you can take multiple terminal windows continued to different ports open at the same time). Thus, if you have an Arduino Serial Monitor window open and try to connect to that same port on a different concluding program, information technology will yell at you and say it could not establish a connection with that port or some such jazz. If yous are ever having problem connecting to a port, make certain it'southward not open somewhere else.
If you don't accept another connectedness open and yet can't connect, make sure all your settings (baud rate, etc.) are correct.
Continued, But Tin can't See Any Data
If you lot are connected to the correct port but don't see whatsoever data, there are two possible culprits. Showtime cheque your baud rate. I know I sound like a broken record, but baud charge per unit is the almost important setting to match up. Cheque that baud!
The other culprit could exist that the TX and RX lines are reversed. Brand sure yous have TX->RX and RX->TX.
Programming Arduino and Series Communication
The Arduino has one dedicated UART, which is just the fancy name for the series TX and RX lines. It is over these two lines that the Arduino gets programmed. Thus, when working with the Arduino (or other microcontrollers) it's best to avoid using these lines to communicate with other series devices, especially if you are developing your code and need to upload frequently.
What happens is, if you lot have another device hooked up to the UART, the information from your computer might not go interpreted correctly by the Arduino leading to code non working the way it'southward supposed to or not getting uploaded at all.
The same dominion applies to serial terminals. If you take a terminal open on the same port that you are trying to program, it won't work. Arduino volition throw some errors about not being able to communicate with that port. If this happens, close your connectedness, and endeavor again.
One simple way effectually this is to utilize the Software Series Library congenital into Arduino to create a carve up UART for exterior series communication. That way, your Arduino can communicate on one port while notwithstanding leaving the default UART open for programming.
Resource and Going Further
That was a lot of information! At the very to the lowest degree, you should walk away from this knowing what a terminal window is, how to use it, which concluding program is best suited for you and your operating system, and how to navigate that program'southward interface. Once more, terminal programs are a very powerful tool when working with serial devices and microcontrollers. Now go collect some data!
If y'all'd like to know more most dissimilar types of communication, visit these tutorials:
- Serial Peripheral Interface
- I2C
To run into some products that require the utilise of a series terminal, check out these hook-upwards guides:
- OpenLog Hookup Guide
- Bluetooth Mate and BlueSMiRF Hookup
- RN-52 Audio Bluetooth Hookup
Or cheque out this blog related postal service:
Your favorite final didn't brand the list? Tell the states which terminal emulator is your favorite and why in the discussion section.

Source: https://learn.sparkfun.com/tutorials/terminal-basics/all
Posted by: bojorquezfrichis1979.blogspot.com
0 Response to "How To Find Baud Rate Of Serial Port Windows"
Post a Comment